Tuesday, October 30, 2012

Spooky !!

 No doubt you've seen this on pinterest ...  I had to try it
 You put it in the crockpot for 8 hrs, cool, and it's caramel ! 
Now that's spooky (in an Alton Brown sort'a way)
and it's good !  

Saturday, October 27, 2012

Santa's "Barn"

(Christmas 2011 )
 
I had a request for a tutorial for this project so here we go ... it's long but not difficult ...
 
I bought a bird house from the $1 bin at Michael's (of course I couldn’t buy a single house I bought 12).  Next carve the “window” (my house already had the "half door"),  I carved with exacto and utility knives; sanded to smooth the rough edges.

The base is a flat, 3.5 inch paper mache ornament, I get these at Hobby Lobby
(I can't find these year 'round, only in the fall)

I paint the barn (inside and out) and base with White Acrylic paint, let it dry

I paint the barn’s red areas, and let them dry. 
Then I cover the entire surface with Sparkle Modge Podge
here's some of the supplies used
Now the fence …
well ... on this project it was a challenge, I couldn’t find the fence I previously used ... so after making a big mess I came up with this … 

I used 2.5 inch “craft sticks” or Popsicle sticks cut to fit.  My fence has four pieces vertical and a single horizontal length.  Paint the fence, let it dry, then glue it onto the barn. 

I add a deer under the fence on the back of my barns

When the fencing is in place then glue the barn to the base ... I use a glue gun for pretty much all my gluing.  

Side note here ... days later :) ... I found the fence I wanted at Joann's ... so  you can see  the fencing options and how they compare 
(please forgive my out of focus pic) 

Now you’re ready to embellish your “Barn” 
I add tinsel garland to the base, used 3 tiny trees (the one to the left is decorated with a tiny snowflake garland), all are glued in place, given a coat of Modge Podge Glitter, and then Snowtex.

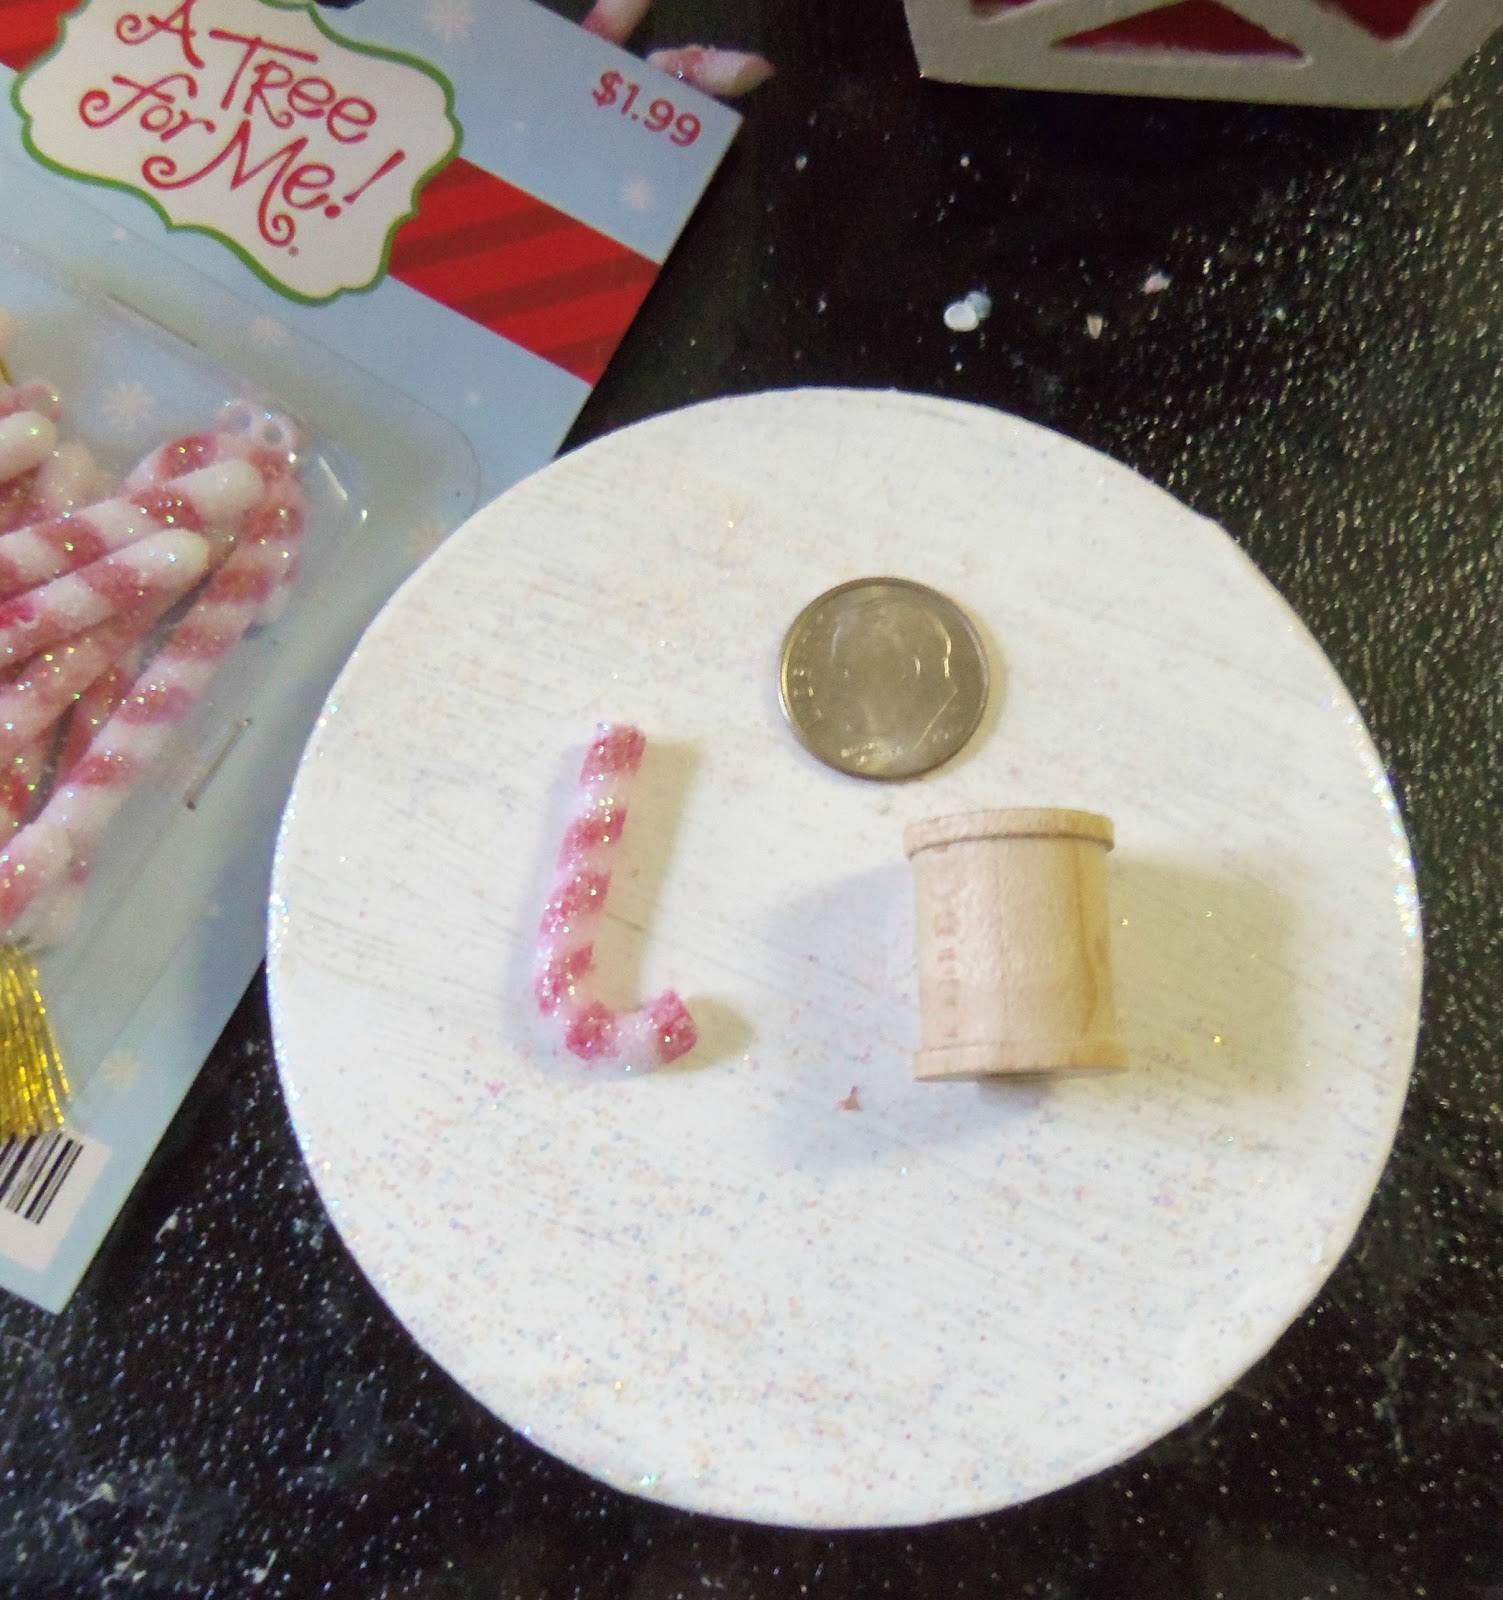
The rain barrel is a tiny wooden spool covered with flat tooth pics, and painted with brown acrylic, the “band” is picture hanging wire.  The “downspout” is a mini candy cane.


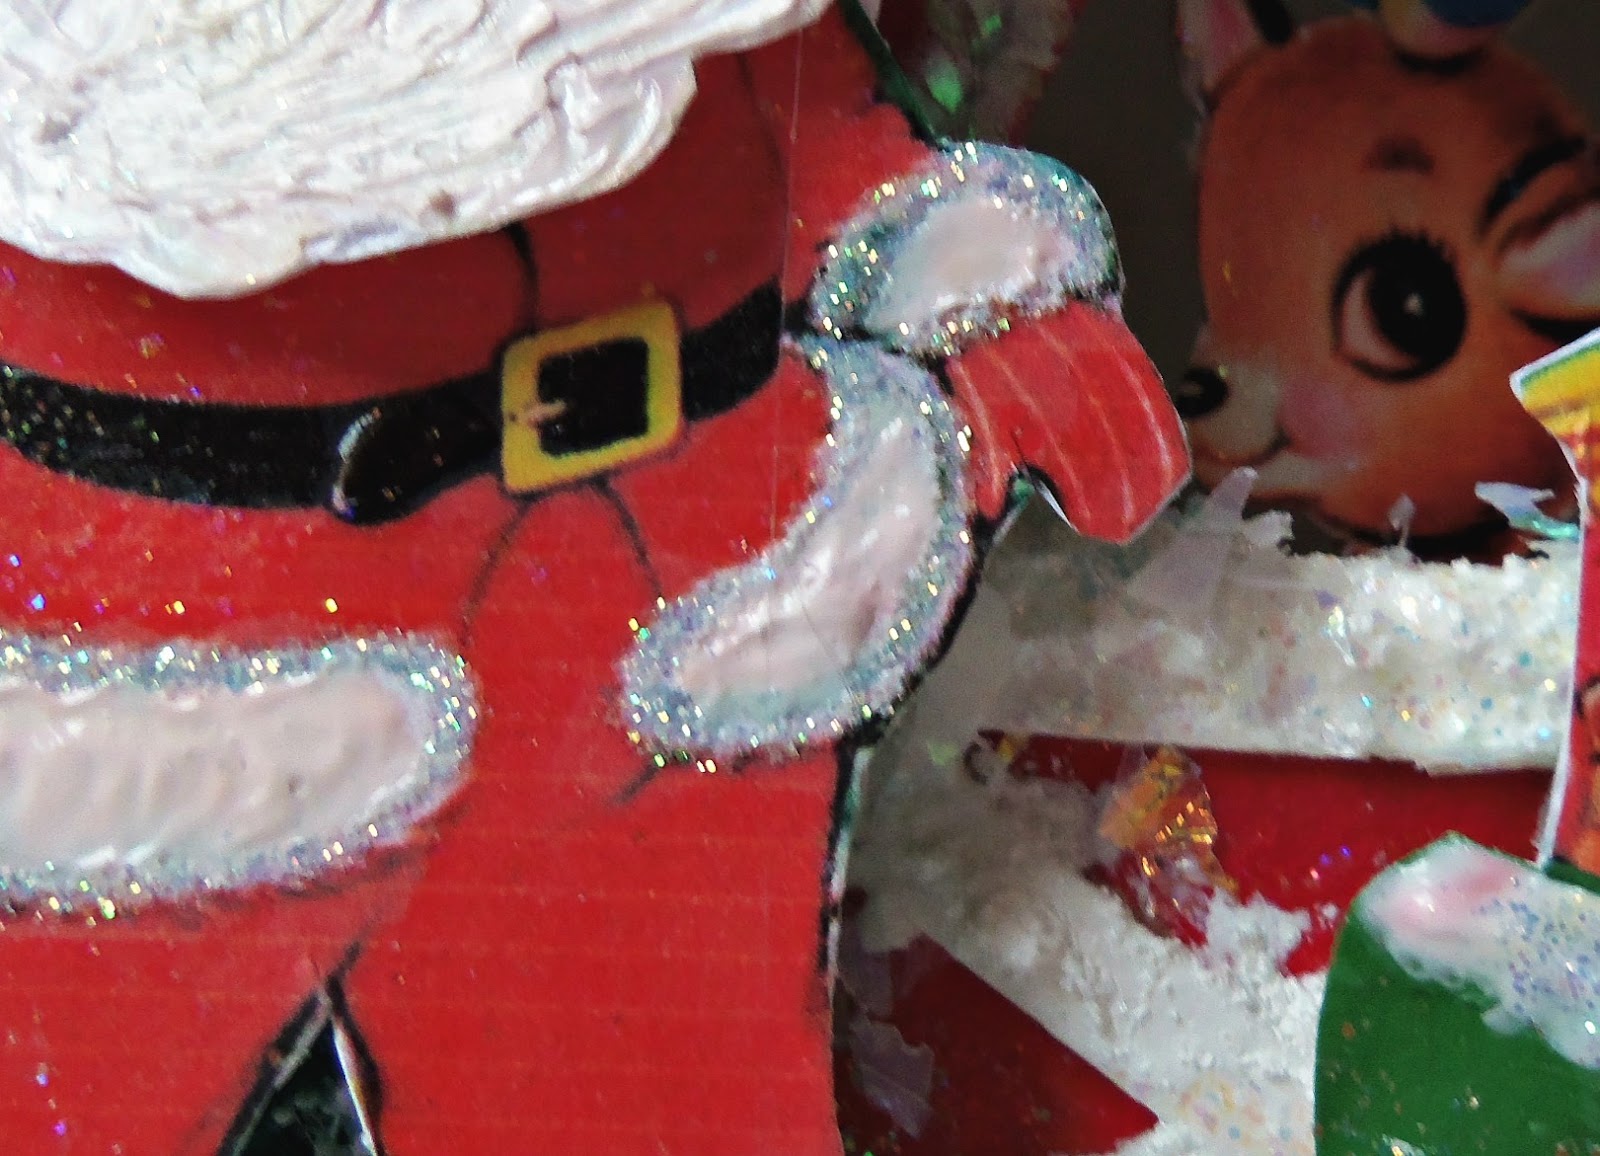
The paper images are from various internet sources, I altered the Santa’s head, because I liked the chubby face of this Santa vs the original.  I alter the size of the images to the desired size using Microsoft Word; Picmonkey comes in handy to improve clarity and color. 
All the paper images are painted with Modge Podge (I will abbreviate MP) … 
MP Sparkle on the bag, Santa’s clothing, the deer; MP glossy on Santa’s belt and boots.
I use Puffy Paint on Santa’s beard and fur trim for dimension, I glitter the edges of Santa’s fur trim.  I finish Santa’s back and toy bag by covering with contrasting paper.  
In adding my paper images, I start with both deer, then Santa, and his bag.  The tricky-est part of this project is getting the deer inside the barn !!!  
 
(top of barn looking inside toward floor)
Sorry but you’re on your own here … I have been known to curse during this step …anyway it’s just a matter of twisting and turning and squirting glue blindly toward the barn floor ... whew now moving on ...
Next add a chenille stem around the “door" .... then let it snow and glitter …
 
I use Snowtex (all this from Hobby Lobby) and cover the fence, roof, base, trees, and barrel/downspout … just smear it on to look like drifted snow.  Let it dry.
Finally, when the Snowtex is dry, I dab MP Sparkle over the roof, base, fence and sprinkle on Buffalo Snow (Hobby Lobby).  Let it dry …
 

add the bow, bells and tag, etc.

 
And there you have it !!  it’s not difficult to do but is a bit time consuming because of the steps that require drying.  If any part of this is confusing or you have a question please let me know.
 
Merry Christmas 2012 

I love little shadow boxes and Putz villages, they whisk me into a land of make believe; I love La La land J.  If you build a Santa Barn I’d love to see yours so  please share your pics with me !! 

Thanks for stopping by, 
E

Supplies:
House (wood or make you own with cardboard)
Base (mine is 3 inch paper mache)
Fence (mine is made from 2.5 inch craft sticks, cut to fit)
Modge Podge Sparkle, Matte, Glossy
Snowtex
Buffalo Snow
Paper images
Embellishments – I used tinsel trim for base, chenille stem around “door”, ribbon, bells, plastic holly, barrel (made from wooden spool and flat toothpicks), mini candy cane
Images:
Deer - Free Pretty Things for You (Thanks Keren !)
Santa and bag I think I found these on Flickr, couldn't find the link, but did find this one, the book is for sale.   
Santa face (Thanks Meri !)

Tuesday, October 16, 2012

The elves are busy


The elves and I have been busy.  We (me and my make believe elves) made a little gift for someone special from blogland who has been "there" for me through some really tough times.  I found her blog in the winter of 2009, I had nothing to do but sit and worry, struggling with daughter issues, a struggle I learned she could understand.  Isn't it funny how we "find" people?   I have faithfully followed her since.  I love her stories, drool over her projects, and so admire her giving nature.  She has no idea what a nice "get-a-way", her world of cuteness brings to me.  I can never repay the favor, but have, for a long time, wanted to send her a little thank you.  

A while back she commented on something I made and so "a little something" is headed her way.  Sometime soon I will post a tutorial (she asked me to), so of course I will (!!) but I'm pretty sure she could make this little creation without my tutorial, and do a killer job.  So E listen for the door bell, because the mailman will soon be delivering a little package, and here's a sneak peek.  

With gratitude and a hug, Elaine (E in TN)

Wednesday, October 10, 2012

A twist on Christmas cards


I'd love to leave my Christmas decorations up all year, I never get tired of Christmas.  I'm not an early Christmas shopper, and don't like stores decorated for Christmas before Halloween, but always have Christmas on my mind.  Today Elizabeth posted a fabulous Christmas themed shadow box tutorial, and this reminded me of a shadow box gift I made for a co-worker last year and thought I'd share my idea with you.  

I love receiving the family photo type of Christmas cards and hate to throw them out.  Last year I ran across  photo cards that I had received the previous year and thought ... hummm I bet these would make a cute shadow box.  So I bought a small shadow box from Michael's, some elements, and paper, and put this little gift together for one of my co-workers, she was thrilled.  
The photo card I received was a collage; I cut the pics out, then embellished
(please excuse the weird edit)

(back)

Today I'm having a "barn raising" for someone special ... although I doubt she believes me (I've been telling her it was coming for months)  ... I promise it's really really coming  :) !!!

As always, thanks for stopping by, E


Friday, October 5, 2012

Little Lamb

Hope you guys had a great summer; my summer was busy, busy.  If you had told me this time last year that I would help friends with 4 - FOUR - baby showers I would have said WHAT??!!  But last week there was, I hope, the last one for a while.  The parents did not want to know the gender, so Momma-to-be wanted a "gender neutral" baby shower.  Her dad raises sheep, so we decided this shower would be themed around “Little Lamb”.  We found this darling birthday party, and thought we might be able to make a similar cake. 


Let me say I DON’T cook, so I told my cousin having the shower that I would do the lamb, but she had to buy a cake … so she did.  
I played with fondant last year when I did my nieces shower so had about 15 minutes of experience and jumped in but do let me say that without my friend AMANDA I would never I attempted this ... thank heaven for Amanda :).  This recipe is so easy, and if I can do this, anyone can. You basically microwave marshmallows and add powdered sugar, knead into a ball, and you have  white fondant !!   To add color, I used the Wilton dyes found at Wal Mart.  Lesson learned here is that once a color is on your hands it sneaks into the next ball of color.  I used red dye for my pink fondant and holy cow what a mess I made !!

To form the body I made rice crispy treats and formed them into the shape.  For the head I put the RCT’s in a small baggy and formed into the shape of a head.  For the legs I made a log shape and once cooled, cut into legs.  

Then you ice over the RCT form with regular cake icing, (I think Duff Goldman calls this "dirty icing"), then cover the form with your sheet of fondant.  To roll fondant into a sheet, simply roll out like dough, using powdered sugar to prevent sticking.   

So here he is, and for the record, this guy looks huge, but actually fits on top of a 10 inch cake.  I don't like his pink muzzle, it's too thick.  I molded it into the white a bit by wetting my finger, also the curls are little rolls of fondant, fixed into place with a dab of water.  
 

So here he is all finished, perched on his “minky” pedestal 


And here are the two that started all this baby shower madness last October.  
These are my nieces twins, hard to believe it’s been almost a year !  He's thinking, "lets change the pistons in this thing", and she is thinking "these colors match my outfit nicely".  I have been absent for months, but read your blogs faithfully, life has been on hold, but what a joy these two are !!  


 Now it's time to do some Christmas crafting !!!   Thanks for stopping by, E